Showing posts with label Crafts. Show all posts

Monday, January 16, 2012

Cohen's Winter ONEderland 1st Birthday


Well, it finally came! Cohen's first birthday! I had been planning and looking forward to this party for many months. The theme changed several times before I settled on this. First it was Cat in the Hat/Dr. Seuss, then it was Monsters, and finally, Cohen's Winter ONEderland! He was born 3 weeks after Christmas so I felt a winter themed party was very acceptable. And I wanted a good excuse to use my favorite, trendy color combo: aqua and red! 

I'll post pictures and add in party details where necessary, but most details will be at the end. (There are LOTS of pictures!)
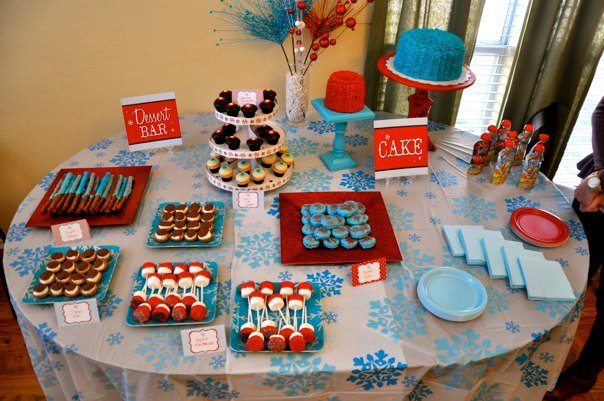


Phew! I think that's most of the decor pics, I'll do another post on party guests!

Party Details:
{first and foremost} Photography by: Leslie Pate, visit her facebook
Birthday Printable package: totful memories
Tissue pom-pom tutorial: somewhatsimple
Table cloths: target
Square red/turquoise chargers: target
Aqua snowflake plates: target 
Cake stands: made by hubby, supplies from Hobby Lobby
Cupcake stand: wal-mart
Chocolate dipped marshmallows and pretzels: yours truly
Chocolate dipped Oreos: Ashley Allen
Chai Latte and Chocolate Marshmallow mini cupcakes: Sprinkles Dallas
S'More bites: Brenda Fendley, Pampered Chef recipe
Guest cake and smash cake with ribbon icing: Sherri Lee Satterlee
Party plates/napkins: Hobby Lobby
Glass milk bottles: Starbucks frapuccino bottles, drank by me :)
Paper straws (aqua and red): dimestorebuddy
Baker's twine (maraschino red and caribbean teal): CraftyTheresaD
Tortilla roll ups: Jackie Ray
Chicken nuggets: chick-fil-a
Pigs in a blanket: yours truly
Dips: made by me, from Sam's Club
Highchair bunting: made by me using MS Word, "Lullaby" font from dafont, patterned paper from totful memories 
Felt snowflakes (aqua): joann fabrics 
Glitter snowflakes (multiple colors, actually ornaments): target
Ornament favors: target 
S'more kits: made by friends and me
Snowballs (cotton candy): made by Sallie Cole
Favor boxes, bags and tins: Hobby Lobby and target
1st Birthday, personalized t-shirt: heatherrogersdesigns
c,o,h,e,n letters, aqua: Hobby Lobby


I think that's about all of the credits, if I left out something, please ask!

Monday, November 28, 2011

Fall/Christmas Wreath

About a month ago I crafted a very cool wreath for fall. It ended up looking pretty Christmas-y, but, it's super cute!

Where did I get my idea? Pinterest! From Ellen's Creative Passage blog.


See? It's a little Christmas-y, but I'm glad now, because I can leave it out for longer than November!

So here's what you need:
grapevine wreath (Hobby Lobby)
wool felt (JoAnn's)
hot glue and gun
scissors
bowls of varying sizes
marker
Pick your colors! Any colors! Match any decor!

Trace your circle.

Cut out your circle.

Spiral cut your circle. Stop when you have a small circle in the middlel As you practice and get better, you can vary the width of your spiral, depending on the type of rose you want.

Start with the outside point.

Begin rolling it up, making a flat bottom out of the edge the scissors touched.

Keep on rolling! Keep it tight and straighten as you go.

This is what it should look like.

Spread hot glue all over the rolled edges, like so.

Fold the leftover circle onto hot glue, making sure to cover all those edges.

Trim of the excess of that circle you just hot glued down.

Voila! How pretty! 

Then change up your bowls to make different sizes. Or, like I mentioned, cut a wider spiral. Even cut your spiral a little uneven to get a more "natural" looking rose. 

Once you finish as many as you want, lay them out on your grapevine wreath. Then, one at a time, hot glue them down. You can fill your wreath with way more, I chose to do an uneven look. Afterwards you can add bling if you want! The blog creator (who created this first) added some glittery snowflakes to her wreath after finishing it. 

Have fun!! Be creative!

Thursday, November 3, 2011

Painting with Pinterest

I decided to do a few crafting projects with Cohen for the fall season. One for us and the other, a gift. ;)

The first one, for us, is a Halloween project. I found this post on Pinterest a long time ago. It's a simple child's painting on black construction paper.


I decided to AMP it up and turn it into something that could hold interchangeable art. Here's what my Cohen made. 

Sweet little 9 month feet. 

5 different sizes of embroidering hoops
1 square of yellow felt
1/4 yard of black felt
white paint
black paint

Cut the felt to size, put into the hoops. Pour some paint onto paper plates. Smear those toes into the white paint. Carefully, and this part is tricky, place the ever-moving foot onto felt, make sure those toes get squished onto the felt. But try not to let the foot smear... or you lose the ghostly look! After dry, paint a dot of black for the eyes on each ghost. 

Next season, change out the art! 

Monday, October 17, 2011

Pinterevolution

I'm not sure if you've jumped on the pinterest wagon yet, or not, but if you haven't.... You should. Right after you read this. :)

You browse their pins, or pin your own ideas (images from websites, blogs, etc) onto boards. You can name your boards. Examples include: "Wedding plans", "Renovating the bathroom", "Halloween decor", "First birthday ideas" etc. Options are literally endless.

Don't get discouraged, though, when you go to get an account. It will tell you that you need an invite. And it may not send you an invite for up to 24 hours (so I've heard), I got my invite within an hour of requesting one (don't be jealous). I tell everyone about pinterest. I got my mom to do it, I convinced a coworker to get one last weekend (didn't take much, right Michelle?), I think I even sufficiently pushed the check out lady at Hobby Lobby today to start one.

You're going to be overwhelmed. There are so many ideas, extremely clever things you'll wish you'd thought of. It helps you find things from the internet (which is so much bigger than I'd ever imagined) that you probably would have never, ever found on your own.

Enough babble, let me show you what I accomplished today.

A few days ago, I saw (on pinterest) a tutorial for how to make babylegs. These are super cute, footless leggings for babies. They're genius. They protect knees while crawling, they make diaper changes so easy (legs covered, but no waist, zippers, buttons, snaps to deal with) and they're darn cute. But they run ya 12 bucks a pop! Anyways, I wanted to figure out how to make them myself, so, I typed "babylegs" into the search box on pinterest. Like a billion images popped up, but I clicked on one that said, "Baby legs tutorial; Easy!" or something like that, I can't remember, because I changed it when I repinned it. But it had this adorable picture to help sway my decision. Here's the original post.

{they cloth diaper, too!!}

So, I wanted to make some babylegs that Cohen could wear with his Halloween costume on Wednesday to the zoo. I found these socks at Target for $6.00. They're women's knee-high socks.

Fuzzy... kinda hard to work with..  But they match our costume.

Cut a straight line above and below the heel, and above the toe.

Fold each small piece over on itself, so the good (outer) sides are facing you.

Pull the folded piece around the bottom of the long sock. All three unfinished edges should be at the end. And you should only see the good sides.

See? Only good sides. 

Stitch around the unfinished edges. I stitched about a 1/4 inch below the edges. I did a kind of loose stitch, I knew it would need to stretch a little.

After sewn, unfold! (it's the one on the left that I sewed. I sewed the right one too, but this is the manufactured end.)

Voila! Handmade baby legs! Can't wait to try these on Cohen for Halloween!

So, yes, that was my first pinterest project! Ready for my second? Ok!!

I saw this a few weeks ago, and when walking past the scrapbooking section at Hobby Lobby today, I decided, Today's the Day. It's a weekly, family calendar from, get this: a collage frame! Behold.

Clever right? It's dry erase because it's glass!

Anyhoo, here are my supplies.
A $12.00 collage frame from Wal*Mart and 8 pieces of scrapbooking paper that I got from a pack (of 36, double-sided) from Hobby Lobby for around $5. (with a 40% off coupon from their website)

Cut your pieces of paper to fit the size of your frames. Mine were 4x6in.

Remove the cardboard pieces and insert your papers. (easy, right?)

Taa-daa! Write on it with a dry erase marker! It can also hang up and down, like the inspiration post.

You can pick any patterns or colors..endless options!

Then hang it up in a central place! I LOVE it!

Are you already a member of pinterest? What have you made?? Please share!

Related Posts Plugin for WordPress, Blogger...